| Install.log Gallery click image to enlarge and colorize |
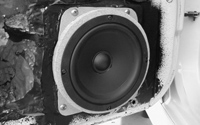
Baffling Revision This was a fairly simple step: make a new mount for the speaker that would push it away from the window glass and into the cabin. Construction is of 1/8" fiberboard and 3/4" particle board. I traced the factory baffle onto the 1/8" board to allow the factory screw mounts to be used. This piece was then glued to the speaker mounting ring consisting of the 3/4" particle board. The only trick here, aside from keeping the RotoZip steady was insuring that the speaker would line up with the hole in the door panel. The photo shows my test fitting, as well as the crappy deadening I did to the door a long time ago. |
 |
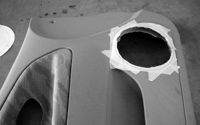
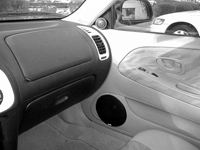
The Hole Thing The fun part, chewing a hole in a door panel which costs $250 to replace. I made the mistake of attempting this with a cordless Dremel the first time. That door took 2 days. The next one I did in an hour with the RotoZip. I cut a rough hole with a cutting bit until I was within an 1/8" of my designated line drawn on the masking tape. Then I attached a Dremel sanding bit to the Roto and slowly opened the hole up to the outline. I finished it off with some sand paper to remove any burrs. Since the map pocket is glued onto the door panel, I also had to open up the hole that was already in the door panel. You can see the inner lip in the photo. |
 |
In the Dog House The [mid] woofer is now tucked inside it's new home. My hope is that this will cut down on door rattling since the woofer is not firing into the back side of the door panel. It should also improve the dispersion without intruding into the cabin excessively. Also, one does not need to be careful of their feet while exiting 'cos it's almost flush with the door panel, and it's protected by the grille that came with it. By the time I reached this point it was clear that the hole wasn't completely accurate. The one in the driver's door (2nd one I did) was so misaligned that I had to "adjust" the speaker mount to shift it forward and down. Aside from a small gap around the speaker grille, I think it turned out quite well for a first effort. |
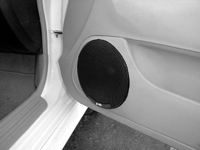 |
Fin And finally we have the finished product. The tweeter is mounted to the sail panel using two screws and the angle-surface cup that they came with. This was one of the easiest things I've ever done and it gave some of the best results. Much better staging than when the tweets were down by the mid. This setup is quite pleasing so I will probably stay with it for awhile. Someday I might move the mids for better imaging, but I ain't holding my breath. The only change will come if I decide to paint the map pocket section that goes around the speaker (white of course). But, I am currently assessing how much I can paint inside the car before I go overboard. I like understatement with a bit of flare... if that even makes sense. |
 |

